Phew, I’m still here after a whole week of DIY’s, and I can’t believe we are on day 7 in my #12daysofDIY challenge!
If you didn’t know already I am posting a new tutorial everyday on my blog throughout the first 12 days in December to help raise awareness and support Shelter this winter! I am so glad you guys have decided to come along for the ride. So far we have jazzed up some old fairy lights, added a little style to the traditional Christmas jumper and made our very own furry stocking.
If you have enjoyed any of my posts and would like to help click the link below to donate via Just Giving. 
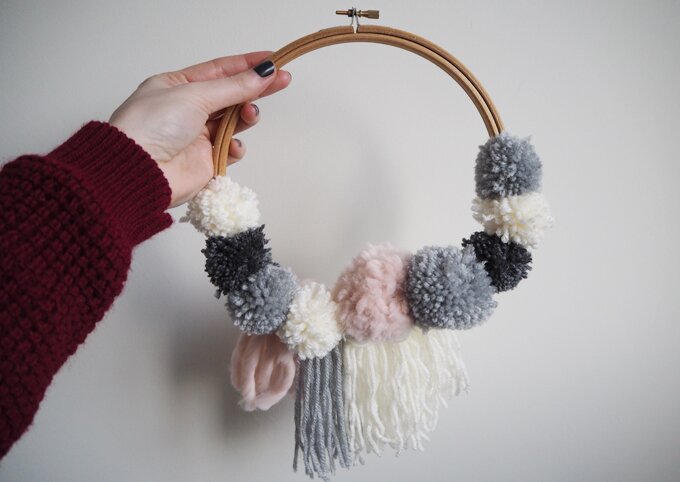
Today I am showing you how I made this super cute pom pom wreath. I couldn’t do DIY December without making at least one wreath, so here is my ode to the traditional wreath with a little hygge twist…


What I used:
Yarn, various colours and size, Wool and the Gang, Stylecraft
Small pom pom maker, The Range
Wooden embroidery hoop, Hobby Craft
Scissors
Glue gun, Hobby Craft
I started off by making lots of small pom poms using my yarn and a pom pom maker. If you haven’t used a pom pom maker before, they are really easy to use and great fun! All you have to do is wrap the yarn around each arm until its nice and full then fold it in on itself. Cut through the center of the maker before tying a piece of yarn around the center to secure all the threads and opening up the maker from both sides. There you have your pom pom, I like to give mine a little trim afterwards.
I was going to just use a bit of cardboard cut into a circle for the wreath base but when I found this embroidery hoop in my sewing stash I thought it could look quite nice, especially with a little bit of wood exposed at the top.


Once I had made all my pom poms, I put them to one side and grabbed my hoop. I added some tassels around the bottom of my hoop to start with, in a similar way to how I made my tassel earrings, (check out my tutorial here).
I gave them a little trim and then started to glue my pom poms in place along the edge of the hoop so they would face outwards. I tried to arrange them with a good mix of colours and textures along my hoop, leaving a gap to expose the wood at the top.


And its all ready to hang on a door or wall. I think this will have to be an interior decoration as it could get a little soggy outside, so I might have to hang it in my front room or bedroom.
You can be as creative as you like with this make, from using different colours, textures or length, you can really make it your own. Why not try making a few smaller ones to hang on your tree or give as presents.
If you like the look of this make, don’t forget to follow me on Pinterest for lots of other makes like this, I have a whole board for Christmas themed DIYs!
Anna x